(→Trivia) |
No edit summary Tag: Visual edit |
||
| (21 intermediate revisions by 15 users not shown) | |||
| Line 1: | Line 1: | ||
| + | {{GameVersion|type = original|reboot = Rebel Specialist|original = Rebel Marksman}} |
||
{{RebelUnit |
{{RebelUnit |
||
| − | | image=[[File: |
+ | | image=[[File:Swamp Marksman.PNG|100px]] |
| name={{PAGENAME}} ''(Rebel Sniper)'' |
| name={{PAGENAME}} ''(Rebel Sniper)'' |
||
| type=Sniper |
| type=Sniper |
||
| − | | aff=[[Rebel Alliance]] |
+ | | aff=[[Rebel Alliance/Original|Rebel Alliance]] |
| primary=[[Sniper Rifle]] |
| primary=[[Sniper Rifle]] |
||
| − | | secondary=[[Blaster Pistol]] |
+ | | secondary=[[Blaster Pistol/Original|Blaster Pistol]] |
| − | | grenade=[[Thermal Detonator]]s |
+ | | grenade=[[Thermal Detonator/Original|Thermal Detonator]]s |
| explosives= |
| explosives= |
||
| other=[[Auto Turret]] |
| other=[[Auto Turret]] |
||
}} |
}} |
||
| ⚫ | The '''Rebel Marksman''' is the sniper unit for the [[Rebel Alliance/Original|Rebel Alliance]]. This unit is used to pick off enemies from long-range, their gun has a double-zoom feature which allows you to really get close-up to the enemy. This means that you will have to aim ahead of the unit, but make sure you will get a head shot the first time. Otherwise, you will give away your position to the enemy and he will move around, preventing you from hitting him. In Star Wars: Battlefront II, the Rebel Marksman and their fellow sniper classes do not get a targeting reticule when not zoomed in, but this is no hindrance to experienced players, who become quite good at hipfiring. (Equivalent- [[Assassin Droid]], [[Scout Trooper/Original|Scout Trooper]], [[Clone Sharpshooter]]) |
||
| ⚫ | |||
| ⚫ | The '''Rebel Marksman''' is the sniper unit for the [[Rebel Alliance]]. This unit is |
||
| ⚫ | |||
| − | <br> |
||
==Attacks (SWBFII)== |
==Attacks (SWBFII)== |
||
{| border= 0 align=float: Left; |
{| border= 0 align=float: Left; |
||
| Line 23: | Line 23: | ||
| [[E-17d Sniper Rifle]] |
| [[E-17d Sniper Rifle]] |
||
| [[File:E-17d.PNG]] |
| [[File:E-17d.PNG]] |
||
| − | | 35 Shots |
+ | | 35 Shots (Console) |
| + | 56 Shots (PC) |
||
|- |
|- |
||
| − | | [[DL-44 Blaster Pistol]] |
+ | | [[DL-44 Blaster Pistol/Original|DL-44 Blaster Pistol]] |
| [[File:DL-44.PNG]] |
| [[File:DL-44.PNG]] |
||
| Infinite Shots |
| Infinite Shots |
||
|- |
|- |
||
| − | | Class A [[Thermal Detonator]] |
+ | | Class A [[Thermal Detonator/Original|Thermal Detonator]] |
| [[File:V-1.PNG]] |
| [[File:V-1.PNG]] |
||
| 2 Count |
| 2 Count |
||
| Line 37: | Line 38: | ||
| 1 Count |
| 1 Count |
||
|} |
|} |
||
| − | <br> |
||
| − | <br> |
||
==Attacks (SWBFI)== |
==Attacks (SWBFI)== |
||
| Line 48: | Line 47: | ||
| [[E-17d Sniper Rifle]] |
| [[E-17d Sniper Rifle]] |
||
| [[File:E-17d.PNG]] |
| [[File:E-17d.PNG]] |
||
| − | | 40 Shots |
+ | | 40 Shots (Console) |
| + | 50 Shots (PC) |
||
|- |
|- |
||
| − | | [[DL-44 Blaster Pistol]] |
+ | | [[DL-44 Blaster Pistol/Original|DL-44 Blaster Pistol]] |
| [[File:DL-44.PNG]] |
| [[File:DL-44.PNG]] |
||
| Infinite Shots |
| Infinite Shots |
||
|- |
|- |
||
| − | | Class A [[Thermal Detonator]] |
+ | | Class A [[Thermal Detonator/Original|Thermal Detonator]] |
| [[File:V-1.PNG]] |
| [[File:V-1.PNG]] |
||
| 3 Count |
| 3 Count |
||
| Line 65: | Line 65: | ||
==Award Weapons== |
==Award Weapons== |
||
*[[Beam Rifle]] |
*[[Beam Rifle]] |
||
| − | *[[Precision Pistol]] |
+ | *[[Precision Pistol]] |
==Skins== |
==Skins== |
||
<gallery captionalign="center"> |
<gallery captionalign="center"> |
||
| + | Rebel Marksman.PNG|The "desert" variant, from Battlefront I maps [[Bespin: Platforms]], [[Bespin: Cloud City/Original|Bespin: Cloud City]], [[Endor: Bunker|Endor]], [[Kashyyyk: Islands]], [[Kashyyyk: Docks]], [[Naboo: Plains]], [[Naboo: Theed/Original|Naboo: Theed]], [[Tatooine: Dune Sea]], [[Tatooine: Mos Eisley/Original|Tatooine: Mos Eisley]], [[Yavin 4: Temple]] and [[Yavin 4: Arena]] |
||
| − | Snow Marksman.PNG|On [[Hoth (planet)|Hoth]], and [[Rhen Var (planet)|Rhen Var]]. (SWBFI, Left) (SWBFII, Right) |
||
| + | Snow Marksman.PNG|The "snow" variant, from Battlefront I maps [[Hoth: Echo Base|Hoth]], [[Rhen Var: Harbour]] and [[Rhen Var: Citadel]]; and Battlefront II map [[Hoth: Echo Base|Hoth]] |
||
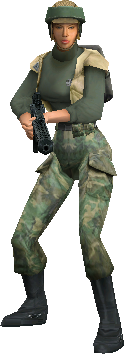
| − | Swamp Marksman.PNG|On Most maps for SWBFII. |
||
| + | Swamp Marksman.PNG|The "forest" variant, from Battlefront II maps [[Felucia: Marshland|Felucia]], [[Kashyyyk: Beachhead|Kashyyyk]], [[Mustafar: Refinery|Mustafar]], [[Dagobah: Swamp|Dagobah]], [[Polis Massa: Medical Facility|Polis Massa]], [[Tatooine: Mos Eisley/Original|Tatooine: Mos Eisley]], [[Yavin 4: Temple|Yavin 4]], [[Tatooine: Jabba's Palace]], [[Utapau: Sinkhole|Utapau]], [[Mygeeto: War-Torn City|Mygeeto]], [[Endor: Bunker|Endor]], [[Naboo: Theed/Original|Naboo]] and [[Coruscant: Jedi Temple|Coruscant]] |
||
| − | Rebel Sniper.PNG| |
+ | Rebel Sniper.PNG|The "fleet" variant, from Battlefront II maps [[Kamino: Cloning Facility/Original|Kamino]], [[Death Star: Interior|Death Star]] and [[Tantive IV: Interior|Tantive IV]] |
</gallery> |
</gallery> |
||
| − | |||
| − | ==Trivia== |
||
| − | |||
| − | *In the [[Death Star- Prison Break]] campaign it is a Rebel Marksman that drops the Death Star plans. |
||
| − | *The Rebel Marksman is female in the Original game and in its sequel. |
||
| − | *Even though the Rebel Marksman is female when she kills herself it says "himself" instead of "herself" in both main games. |
||
| − | *The Rebel Marksman is male on The [[Tantive IV: Interior|Tantive IV]], and The [[Death Star: Interior|Death Star]] instead of female. (SWBFII) |
||
==Gallery== |
==Gallery== |
||
<gallery captionalign="center"> |
<gallery captionalign="center"> |
||
| − | RebelMarksman.jpg|A Rebel Sniper. |
+ | RebelMarksman.jpg|A Rebel Sniper (Battlefront II). |
| − | RM.PNG|A Rebel Sniper. |
+ | RM.PNG|A Rebel Sniper (Battlefront). |
</gallery> |
</gallery> |
||
| Line 95: | Line 89: | ||
[[Category:Sniper]] |
[[Category:Sniper]] |
||
[[Category:Galactic Civil War era]] |
[[Category:Galactic Civil War era]] |
||
| + | [[Category:Star Wars: Battlefront]] |
||
| + | [[Category:Star Wars: Battlefront II]] |
||
Latest revision as of 23:02, 25 December 2020
| |
|
| Rebel Marksman (Rebel Sniper) | |
| |
| Basic Info | |
| Type: |
Sniper |
| Affiliation: | |
| Unit Details | |
| Weapons: | |
| Secondary Weapon: | |
| Grenades: | |
| Other: | |
The Rebel Marksman is the sniper unit for the Rebel Alliance. This unit is used to pick off enemies from long-range, their gun has a double-zoom feature which allows you to really get close-up to the enemy. This means that you will have to aim ahead of the unit, but make sure you will get a head shot the first time. Otherwise, you will give away your position to the enemy and he will move around, preventing you from hitting him. In Star Wars: Battlefront II, the Rebel Marksman and their fellow sniper classes do not get a targeting reticule when not zoomed in, but this is no hindrance to experienced players, who become quite good at hipfiring. (Equivalent- Assassin Droid, Scout Trooper, Clone Sharpshooter)
The Rebel Marksman is a very vulnerable unit, being able to take less damage than any other rebel unit besides the spy, which can take as much damage. The Wookiee Warrior is about 2 1/2 times tougher than a Marksman.
Attacks (SWBFII)[]
| Name | Image | Ammo |
| E-17d Sniper Rifle | 35 Shots (Console)
56 Shots (PC) | |
| DL-44 Blaster Pistol | Infinite Shots | |
| Class A Thermal Detonator | 2 Count | |
| A1 Auto Turret | 1 Count |
Attacks (SWBFI)[]
| Name | Image | Ammo |
| E-17d Sniper Rifle | 40 Shots (Console)
50 Shots (PC) | |
| DL-44 Blaster Pistol | Infinite Shots | |
| Class A Thermal Detonator | 3 Count | |
| R4 Recon Droid | 1 Count |
Award Weapons[]
Skins[]
")
")
")
")
Gallery[]
")
")
Links[]
- Back to Infantry
| Rebel Units | Rebel Soldier · Rebel Vanguard · Rebel Marksman · Rebel Smuggler · Bothan Spy · Wookiee Warrior · | |
| Land Vehicles | Alliance AAC-1 · Rebel Combat Landspeeder · T4-B Heavy Tank · Snowspeeder · 74-Z Speeder Bike | |
| Space Vehicles | X-Wing · Y-Wing · A-Wing · Alliance Assault Craft · B-Wing · Millennium Falcon · Corellian Corvette · Rebel Transport · Nebulon B-class Frigate · Mon Calamari Star Cruiser · Home One | |